Friday, 12 October 2012

Detailed plan of music video production


28th October: planning

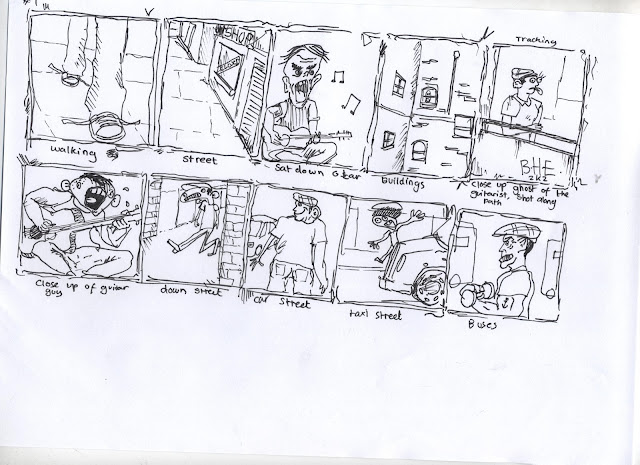
·         Drew out a story board of the 30 seconds, and sorted out the timing of each shot.
·        We decided as a group which where the best locations to film the 30 seconds of are chosen music video.   They were;
‘Fozzy’s’ chip shop
 Wyke premises- Side of the ASH building and the Car park.  

1st October: Filming
First day of filming!;
  •           Shot one- Tracking shot of Scott’s feet (Shot at the side of the main entrance of the college).
  •          Shot two- Tracking shot of the shops (Fozzy’s) on the left hand side of the shot.
  •          Shot seven- A medium shot of Scott walking round the corner(Shot from the front of the shops).
2nd October: Filming
Second day of filming;
·         Shot three- Medium wide shot of Benn playing the guitar/ Lip sync (Shot at the side of ASH Building).
·         Shot six- Medium close up of Benn Playing the guitar/ Lip sync (Shot at the side of ASH Building).
·         Shot five- Long shot of Scott walking past railings (Shot opposite the car park).
·         Shot four- Zoom out, with a tilt down of the back of ‘Fozzy’s’ chip shop (Shot at the back of the ASH Building).

3rd October: Filming Third day of filming;
·         Because it had rained on the 2nd of October, we decided to re-shot shots three, six, and seven.
·         Shot three- Medium wide shot of Benn playing the guitar/ Lip sync (Shot at the side of ASH Building).
·         Shot five- Medium close up of Benn Playing the guitar/ Lip sync (Shot at the side of ASH Building).
·         Shot six’s- Long shot of Scott walking past railings (Shot opposite the car park).
·         Shot eight – Long shot of Scott walking from behind a small building, going into a zoom with a slight tilt.
·         Shot nine- Medium back shot of Scott walking down the centre of the car park (shot in the Wyke car park).
·         Shot ten- Medium long shot of Scott walking past a car (Shot in the Wyke car park).

5th October: Filming
Last day of Filming;
·         Because of the rain on the 2nd October, We decided to re-shot shot four.
·         Shot four- Zoom out, with a tilt down of the back of ‘Fozzy’s’ chip shop (Shot at the back of the ASH Building).

8th October: Editing
First day of Editing!;
·         Our group were set up on an editing suit.
·         Pulled across all of the film clips on the editing program, and decided which clips we wanted to dispose of and use.
·         Added the song track on to the editing program.
·           We then started to add and edit the correct clip to each given time.

9th October: Editing
Second day of Editing;
·         Lip Sync the clips of Benn with the song track.
·         Carried on editing each clip to the correct given time.
·         Pieced each editing shot together.

10th October: Editing
Last day of Editing;
·         Once all the clips where in the correct given time, we changed the brightness, contrast, and tone/colour.
·         When finished, we embedded our clip on youtube, and posted it on each members of the group.  

Wednesday, 26 September 2012

Planning

Planning

Location
First shot- Walking down paverment on college grounds
Second shot- Shot of the street
Third shot- Sat down against a brickwall, playing a guitar
Forth shot- shot of the back of shops from the rose gardens
Fifth shot- sat down against a brick wall, playing a guitar
Sixith shot- shot at the side of college, near the main entrance
Seventh shot- sat against a brick wall, playing a guitar
Eighth shot- shot at the side of college, near the main entrance
Ninith shot- shot of the car park, within college grounds
Tenth shot- shot of the car park, within college grounds

Deconstruction+Reconstruction of a Media Text


Production Plan

Missing Andy- The Way We're Made (Made In England)

Poppy Elgey- Director
Beth Fell- Camera Woman
Hannah Burton- Editor
Benn Green-  Camera/Editor
Scott Davis- Producer
Peter Holderness- Editor/ Camera Man

Monday, 24 September 2012

Codes and conventions of a Pop Music Video


Cinematography
There are two common structures of a pop song. One being a solid performance video, focusing on the artist and the way he/she creates the emotion. And a narrative/ performance video, creating a story based on the lyrics of the song.
Medium shots and Long shot are used to create a scene and setting to the audience. This can also be shown through a Close up.
Establishing shots are used to indicate the location.
Two other shots commonly used in pop videos are; Over the shoulder shots and high and low angle shots. 
It is found that most music videos try and be creative by utilising the visuals of the camera angles. This entices the audience and has a unique selling point.
In Peter Andrew’s music video, ‘Unconditional’ starts with an establishing shot.
This shows the audience that the video is taking place in a musical theatre. It is a common way to start a music video. 
Camera Movements
Common camera movements used in a pop song are: Tracking, panning, tilt and arc shots.
At the beginning of Will Young’s, ‘Jealousy’ the camera movement portrays the characteristics, and creates realism within the story.

Editing
Common editing techniques are, montage, continuity, transitions, eye line match, match on action, shot reverse shot and a cut.
The editing techniques are there to illustrate the changes within a music video. The way the video creates a change of mood and changes the atmosphere through the lyrics is shown through the quick transitions, and the continuity in the lyrics. 

Mise-en scene
Mise-en scene consists of 5 key points. Location, Props used, Lighting, Costumes, and Characters to the audience. Through the mise-en scene, the audience is meant to know the theme, and the creation of the atmosphere.
In a performance video, the artist, or band singing the song is shown giving the audience a connection with the artist or band. One of the best music videos to show this, is Peter Andrew’s ‘Unconditional’.
In a narrative video, the mise-en scene needs to have a strong establishing shot to outline the style of the narrative. In Pixie Lotts ‘Broken Arrow’, Pixie lott is part of the narrative story. You will find that not every artist will take part in the narrative alongside the performance.  

Sound
Sound is a major part to a music video. It consists of diegetic, non diegetic and a voiceover. An advantage of a voiceover is, it helps to tell the meaning of the lyrics, or the narrative. A music video I know that contains a voiceover is Jessie J, ‘Nobody’s Perfect’.    

Friday, 21 September 2012

Describe and evaluate your skills development over the course of their foundation portfolio.

In my foundation portfolio I was asked to design and create a music magazine, which included; a front cover, contents page and a double page spread on an artist featured in my magazine. At the beginning of the year, I designed a front cover and a contents page for a college magazine. I did some research on the internet into background information about the college. This helped to collect some ideas, and personal feelings on how students felt about the college they attended. I took sufficient images of students, the college, and rooms of the college where specific studies take place. 

From here I was introduced to a computer programme known as adobe Photoshop. I had come across adobe Photoshop when I was doing my GCSE Art course. I’d based my final project on emotions of the body and thought that photography was the best way to interpret it. My art teacher had shown me a few basic skills like using the blemish tool to even out the skin on my models, the eraser tool, smudge and blur tool to try and make the images I had cropped onto another background making the image realistic. And to be able to change the colour to a specific part of an image, or the full image itself. (The programme was a major part of the creation in designing my music magazine.) I designed 3 different magazine cover drafts. When all 3 drafts where finished I created a survey and asked students at the college to mark out of 10, which cover best presented the college and brought across the right meaning. This helped me to develop all three ideas into my final cover. I then based my contents page around similar designs and features to my front cover. Each bit of work and research I made, I posted onto my blog, giving regular updates, and detailed writing about the work that I was producing. 

First, I looked into the many various genres within music. This would help choosing a target audience and a demographic group. It also helped with the characteristics of my magazine as I was able to base the appearance beside the genre of music. I did my research on existing music magazines which fitted within the music genre I had chosen. I wanted to make sure that I was going in the right direction with my ideas and originality. When I had the structure and the layout to my magazine, I started taking images of my models. I wanted them to be relaxed and show there true selves so when I started editing the photos, I could bring across a natural image. When I was happy with my photos I started editing them on adobe Photoshop.
I began with editing the background. Even though I’d taken my images with the set background of a brick wall, it had no purpose towards the genre within my magazine. By using the cut tool, I edited the brick wall out, outlining the models before using the eraser to erase the brick wall out. Following that, I used the smudge and blur tool, making sure that the edges were smooth, and blended in to the white background giving the image a natural approach. To make the image stand out, I changed the tone, colour, and contrast to warmer colours. By doing this you could see the finer details of the facial features of the models. Using the blemish tool, I was able to click on a certain skin tone to each models skin, making my models have an airbrushed appearance. When I’d reduced the size of the image, I placed appropriate texts around the image such as; the masthead, sell line, main cover line, coverlines, teasing contents, price, date, issue and barcode.

I then started designing my contents page. Setting the background black, using the same housestyle, adding several different images, having a feature section, news section, and a reviews section. With the images, I changed the tone and colour to black and white. By adding in a brighter contrast, I felt it highlighted the image, making it standout being the main attraction. Finding the right tone of the colour on my models skin, I used the blemish tool editing out the blemishes on peoples skin creating an airbrushed affect.

I then went on to finishing my double page spread on my featured band (Two of A Kind). I went back with the original images I had taken of my two models and developed them within Photoshop. I edited out the brick wall, and replaced it with a simple white background. Next I used the smudge tool to create a smoother edge to the images. I was then able to use the blur tool. This helped to blur the image into the white background, assembling a realistic image. As a result of changing the tone and colour of the images, I was able to create a warm touch/texture. Plus by changing the brightness on the contrast, I was able to bring out there facial expressions. Thus adding in the finishing touches of an article. 

With designing 3 different parts to a magazine, I feel I have developed many new skills, and developed on the skills I already had. Even though I had some knowledge with Adobe Photoshop due to my art course at GCSE, I feel that I’ve developed a number of techniques within the program. I didn’t have a great knowledge on the program, but even with some of the skills and techniques I had didn’t really give me an advantage over other people that had no experience with the program. There was so much more for me to learn about Photoshop and that has grown throughout my first year. And with all the research on music, music magazines I feel I have gained more knowledge about the music business and was able to see just how much of a big influence media has on the music industry.